Leaky Clock Batteries and capacitors.
Most Amigas use a rechargeable 3.6 volt NiCd battery to keep the clock operating when the Amiga is switched off. These batteries deteriorate with age and start to leak corrosive fluids after several years. These fluids will eat away the copper tracks of circuit boards and destroy ICs and other components, ruining your Amiga. PCs don't have that problem as they only last at most a couple of years before they are thrown out and upgraded, long before their batteries have a chance to leak.
As even the newest Commodore-made Amigas are now over 30 years old, it is vital that the batteries are checked, and if necessary replaced. From my experiences, all Amigas now have leaking batteries, so log out
IMMEDIATELY and check your battery! If you don't, your Amiga will stop working one day and it may not be possible to repair it as part of the PCB may be dissolved away! . You have been warned!
One of the best ways to make your battery leak is to leave the Amiga unpowered for a long time. One one occasion I had an A4000 that had been used daily for 10 years. The battery never gave the slightest hint of
leaking. It was then stored for two months, and when I checked the battery afterwards, I found it leaking badly. Fortunately the corrosion process had not yet started. So, if you intend to store your Amiga for
any period of time, you MUST remove the battery (unless it has already been replaced by a new lithium type). Don't do what one person did - he stored two A3000s on their sides for 5 years. The batteries leaked and
dribbled across the motherboard, leaving a frightful mess.
Note that these batteries contain cadmium, which is toxic. It is strongly advised to thoroughly wash your hands if you come in contact with any leaking matter from these batteries. For this reason
it is also advised to not simply throw it out in the garbage but to dispose of it in a recycling facility that can handle old batteries and other similar materials.
How to spot a leaking battery.
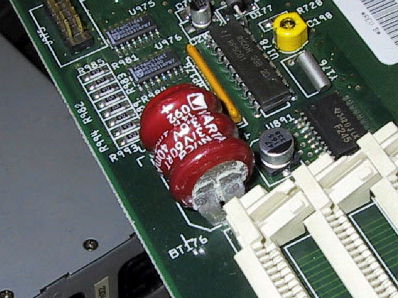
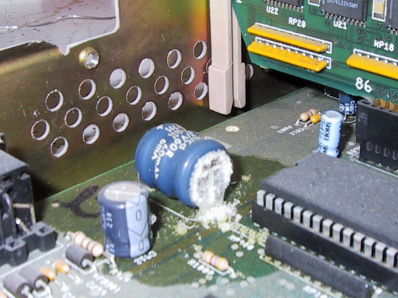
The picture on the left above shows a typical leaking battery on an A4000D motherboard. You can see the white crud leaking out of the end. This is by no means the worst one I have seen (the owner wiped most of
it off before I had a chance to take a picture of it). On the right is a typical battery in an A2000. As you can see the leakage is very extensive. It even penetrated into the CPU socket and was starting to corrode the CPU pins. As you can imagine, it is very difficult to clean it out properly from under all those parts. All Amiga models use similar batteries. They are all the same size and shape. They all leak eventually, especially if the Amiga is not used regularly. So, if you intend to store your Amiga for a long time (more than a few months), I strongly advise you to either replace or remove the battery first. Some 3rd party devices may have a "coin" type battery. These are lithium and are much less likely to leak.
Some of the most common faults in the A4000, where only 4MB of fast ram is available, or when the A4000 thinks it has ECS chips, are caused by damage from leaking batteries. Check the ICs closest to the battery,
U176 & U177.
How to remove a leaking battery.
The battery can be removed in the usual way with a soldering iron. However, in an emergency, or for those without soldering facilities, removal may also be achieved by snapping if off the motherboard. Hold the battery and push it back and forth longitudinally until it breaks free. Once removed, it is strongly advised that the motherboard be cleaned as the alkaline residue from the leaked battery can continue to cause further damage.
After removing the motherboard from the Amiga, start by cleaning the affected area with a small brush and methylated spirits. This removes any grease and helps make the next step more effective. Next, get some weak acid such as vinegar or lemon juice and use the brush to clean the affected area thoroughly. For stubborn areas an old toothbrush is ideal. In cases where there is a large amount of battery leakage, fizzing may occur. Make sure the acid penetrates into all areas affected by battery leakage. Let the acid continue to soak for about 15 minutes, longer for badly affected areas. When you are satisfied the spillage has been neutralised, rinse with warm water. Next clean the entire board with brush and methylated spirits, and then rinse well in hot, clean water, using a brush to make sure all areas are rinsed thoroughly. Shake off excess, then put the board in a warm dry place for several hours to dry. Warm sunshine works well, otherwise in front of a heater so that the board is heated to about 30 to 40 deg C.
If you are lucky, and the PCB was not damaged by the leakage, you can replace the battery and reassemble the machine. Otherwise you may find that components and PCB tracks neaby have been corroded or even destroyed. Any affected PCB sockets should be replaced. In the A2000 this is usually the CPU socket and the Kickstart socket. Damaged PCB tracks may need to be repaired, especially on the A4000. There are a number of youtube videos outlining in general terms how to repair damaged tracks. They can be easily found
Fitting a new battery.
This step can be omitted if you are not concerned about having correct time and date on your Amiga. Note that the A3000 has certain system settings that are lost if there is no battery.
A new NiCd battery may be soldered in place of the old one, however, I do not recommend this as the new battery will also be prone to leakage after a few years. A better alternative is a NiMH (Nickel Metal Hydride)
battery. This looks and works exactly like a NiCd battery but it is more durable and less likely to leak. It is still wise to periodically inspect the new battery for leakage.
The newest and best alternative is to use a 2032 type lithium coin battery as is commonly used in PCs these days. The battery holder can be removed from an old PC and soldered in to the space formerly occupied by the NiCd battery. Due to the configuration of the holes on the motherboard, the holder may need to be angled. Sometimes a small portion of the plastic body may need to be shaved or cut away to make it fit. Because these lithium batteries are non rechargeable, the charging circuit in the Amiga must be disabled by inserting a diode in series with the new battery. Anode is connected to the + terminal of the battery, and the cathode of the diode then becomes the + terminal of the diode and battery assembly. There is also a document on Aminet explaining how to use a lithium battery in an Amiga in hard/hack/lithbatt.lha
Using the correct type of diode.
To get the most life out of the battery, the correct type of diode needs to be used. Most people just use an ordinary silicon diode such as a 1N914. Unfortunately, silicon diodes have a forward voltage drop of
about 0.65 volts. This means that the clock chip is only getting 2.35 volts out of the 3 volt battery. Obviously, as the battery runs down its voltage will drop further, and as the clock chip is designed for 3.6V, it won't take long before the voltage is too low to maintain the clock.
The best type of diode to use is a Schottky diode (sometimes called a 'Hot carrier Diode'). These can have a forward voltage drop as little as 0.15 volts, which means that 2.85 volts is available to the clock chip. Examples of Schottky diodes are the 1N581 or the 1N5711.
If a Schottky diode is not available, the next best alternative is a germanium diode. These have a forward voltage drop of about 0.3 volts, leaving 2.7 volts available. Examples of germanium diodes are OA90, or 1N34...yes, an ancient 1N34 from WWII works well!
It can be a little difficult to find a neat and effective place to install this diode, but I have found it can be installed in place of the 470 ohm resistor that is in series with the battery. This resistor was
designed to limit charging current, and is now redundant with a non chargeable battery. Simply remove this resistor and replace it with the diode. Nice and neat and no wonky hacks! See the pic below.

In the example above, from an A2000 with a rev 6.2 motherboard, you can see a 1N34 germanium diode installed where R803 was at the bottom left. Cathode is to the left. You can also see how the battery holder is angled, the + terminal on the battery is soldered to the left + terminal on the motherboard, leaving the right terminal vacant as shown.
Leaky capacitors.
Like all electronic devices, all Amigas contain electrolytic capacitors. These contain a liquid electrolyte which can degrade, leak, or dry out over many years. The best way to avoid degrading of these capacitors is to make sure the device is powered up periodically. This reforms the dielectric in the capacitor which normally degrades with disuse. Degraded capacitors can usually be 'reformed' by powering up the device with some means of current limiting installed for the 20 or so minutes needed for this process to occur.
A much more common and serious problem in Amigas is leaking or dried out surface mount capacitors. These are found in the A600, A1200, A4000(T), CD32 and a number of expansion cards like the A3640. These were fairly new technology when these Amigas were built, and the manufacturers hadn't quite worked out how to seal them properly. These capacitors can either dry out, rendering them ineffective, or they can leak an oily and corrosive liquid onto the motherboard. Usually they can be identified by dull looking solder connections, but even if they look OK, I would strongly advise every one of these be replaced. Quite often these bad capacitors can cause audio problems, or in the A1200, the screen may flicker during floppy access, but even if there are no symptoms, the corrosive fluid will eat PCB tracks, and cause far worse problems in the future. So replace all of them immediately! Note that these surface mount capacitors can be found in most floppy drives too, including the ones used in earlier Amigas like the A500. They also need replacing. The earlier through hole capacitors generally don't need replacing, but they still need to be inspected for leaks, dullness on their leads, or bulging ends.
I'm not going to provide instructions on how to replace these capacitors, as this should be done by experienced people only. It is very easy to rip off or damage the PCB pads these capacitors are soldered to. If you are inexperienced, and really want to do this, I strongly suggest you practice on an old, unwanted PCB first, and do it until you are 100% sure you won't damage anything. Like with battery replacement, the PCB will need to be thoroughly cleaned to remove any leakage, otherwise corrosion will continue. One final point to mention is that Commodore soldered quite a few of these capacitors on backwards, and to make matters worse, they also printed the polarity markers on the PCB backwards too! So check online for whatever machine you are recapping and make sure capacitors are replaced appropriately. Finally, it is a good idea to place a label showing the date you recapped the board.