Removing yellowing from old plastic items.
Many people have discovered that the cases of their old computers have become yellowed after many years. This discolouration cannot be washed off as the plastic itself has been discoloured. It mostly affects
ABS plastic, one of the most popular type of plastic used for computer cases, keyboards and other similar items.
Causes of discolouration.
There are a number of possible causes, which, on their own or in combination, which can cause this discolouration. I won't go into the fine details, but a technical explanation can be found here.
1: The quality of the plastic: ABS is a mixture of several different polymers and stabilising agents. The stabilisers are intended to prevent yellowing, however they can be depleted by the oxidising process. Once depleted, yellowing can occur. It has been noted that individual keys on a keyboard can exhibit different amounts of yellowing, even though they are all exposed to the same environmental conditions. Some keys may have come from different batches with different amounts of stabiliser in them.
2: Exposure to light or heat: After a great deal of observation over the years, I have come to the conclusion that light alone is not really a factor, except where the presence of infra red causes the item to heat up. I have had items stored in completely dark, but hot locations that have been badly yellowed.
3: Oxygen: Discolouration is the result of a chemical reaction between certain ingredients used in the plastic and the oxygen in the air. Items that are in locations where air can't freely circulate do not yellow. Placing something on an item will do this, leaving behind an un-yellowed area. Or there may be an item that is yellowed on the exterior, but not on the interior. This also means that only the surface of the item is discoloured, the rest of the plastic underneath is not affected.
4: Surface condition: If the surface of the item is degraded (possibly due to excessive exposure to UV light, harsh chemicals, or the result of certain ingredients gradually evaporating out of the plastic as a result of age and heat exposure), there may be microscopic pits or cracks in this surface. This increases the surface area of the plastic, meaning that more oxygen can get in to cause discolouration.
So, the best way to yellow an item is to have it made from ABS, keep in the open air, in a warm to hot place, and also subject it to a lot of radiant heat eg: light coming in from a window or radiating from an uninsulated roof. All this for a long time.
How to remove discolouration.
It seems everyone has their own favourite recipe or method to achieve this. Basically we need to reverse the chemical reaction that caused the original discolouration. Usually these recipes involve hydrogen peroxide, a small quantity of laundry "booster" and a wetting or gelling agent which helps the solution stay on the plastic after being painted on. The item is then exposed to sunshine or UV light for several hours. Variations of this are known as 'Retrobrite' and can be found by using Google.
I have never really liked this approach. Having a thin layer of solution painted onto the plastic means that it's prone to drying out, which causes the reaction to stop. The solution then has to be reapplied. With the hot Australian sunshine here, I find I have to constantly apply the solution for several hours. Not ideal at all! Some people paint the solution on and then cover with cling wrap to stop it
drying out. While effective, it's hard to paint the solution on evenly and there have been many cases of uneven results, with some areas with less discolouration removal than others.
I have found a method of removing discolouration that is simple, cheap, effective, and gives excellent results. It simply involves purchasing an inexpensive jar of 'laundry booster' from the supermarket. An example is "Vanish Oxi Action". There are many other brands, they often have 'Oxy' in their name. Look for sodium percarbonate in the ingredient list. Dissolve it in water in a shallow container, and then fully submerge the item to be whitened in the solution. You may need to attach weights to keep the item submerged. The whole thing is left in the sun for several hours. Stir occasionally. I have found about a cup of laundry booster for every 10L of water works well. You can experiment with different quantities of laundry booster as it does not seem to be critical. I'm lucky in that I live in Australia with very strong sunshine, however I still get good results on cloudy days. The sodium percarbonate, when dissolved in water, creates the hydrogen peroxide that is needed to remove discolouration. It's worth noting that this solution is a milky white. I think this is an advantage as it helps diffuse the UV light, resulting in a much more even effect, without noticeably slowing the process. As a bonus, these laundry boosters also contain a strong detergent, helping to make sure any residual grease, oil, or dirt does not prevent the hydrogen peroxide from actually contacting the surface.
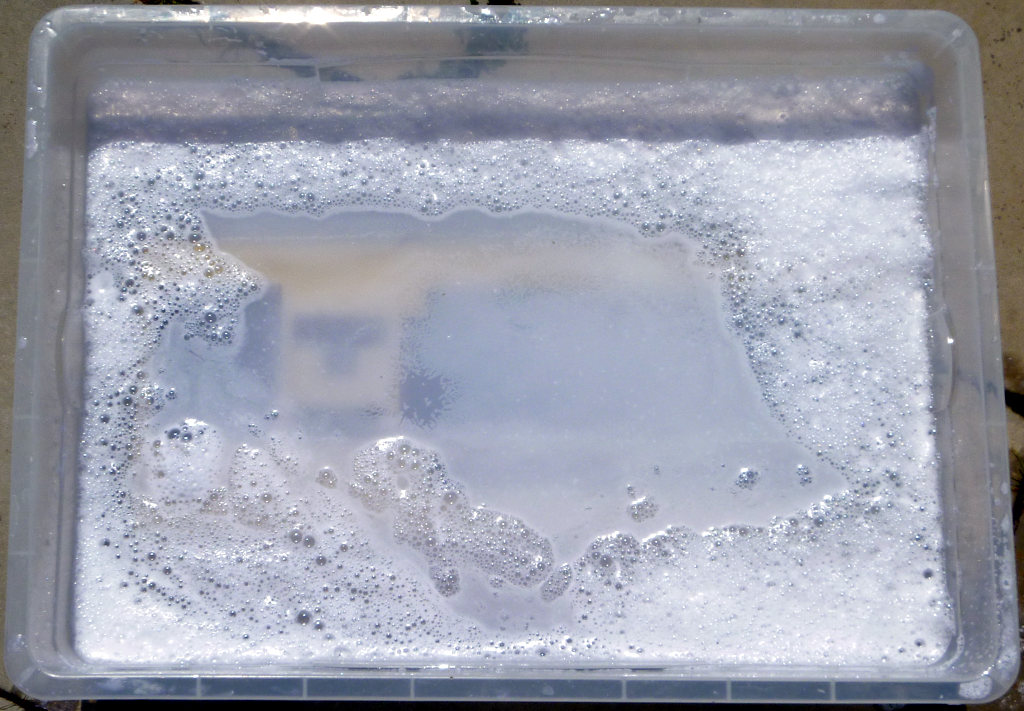
Some people have observed that UV light is not necessary when the hydrogen peroxide solution is heated. I was unable to confirm this, however, the process does speed up dramatically when the solution heats up after being in the warm sunshine for a while. Below is a picture of an item being retrobrited by the soak method. The froth does not have any harmful effect on effectiveness, and it usually disspates after a short while anyway.
What to expect.
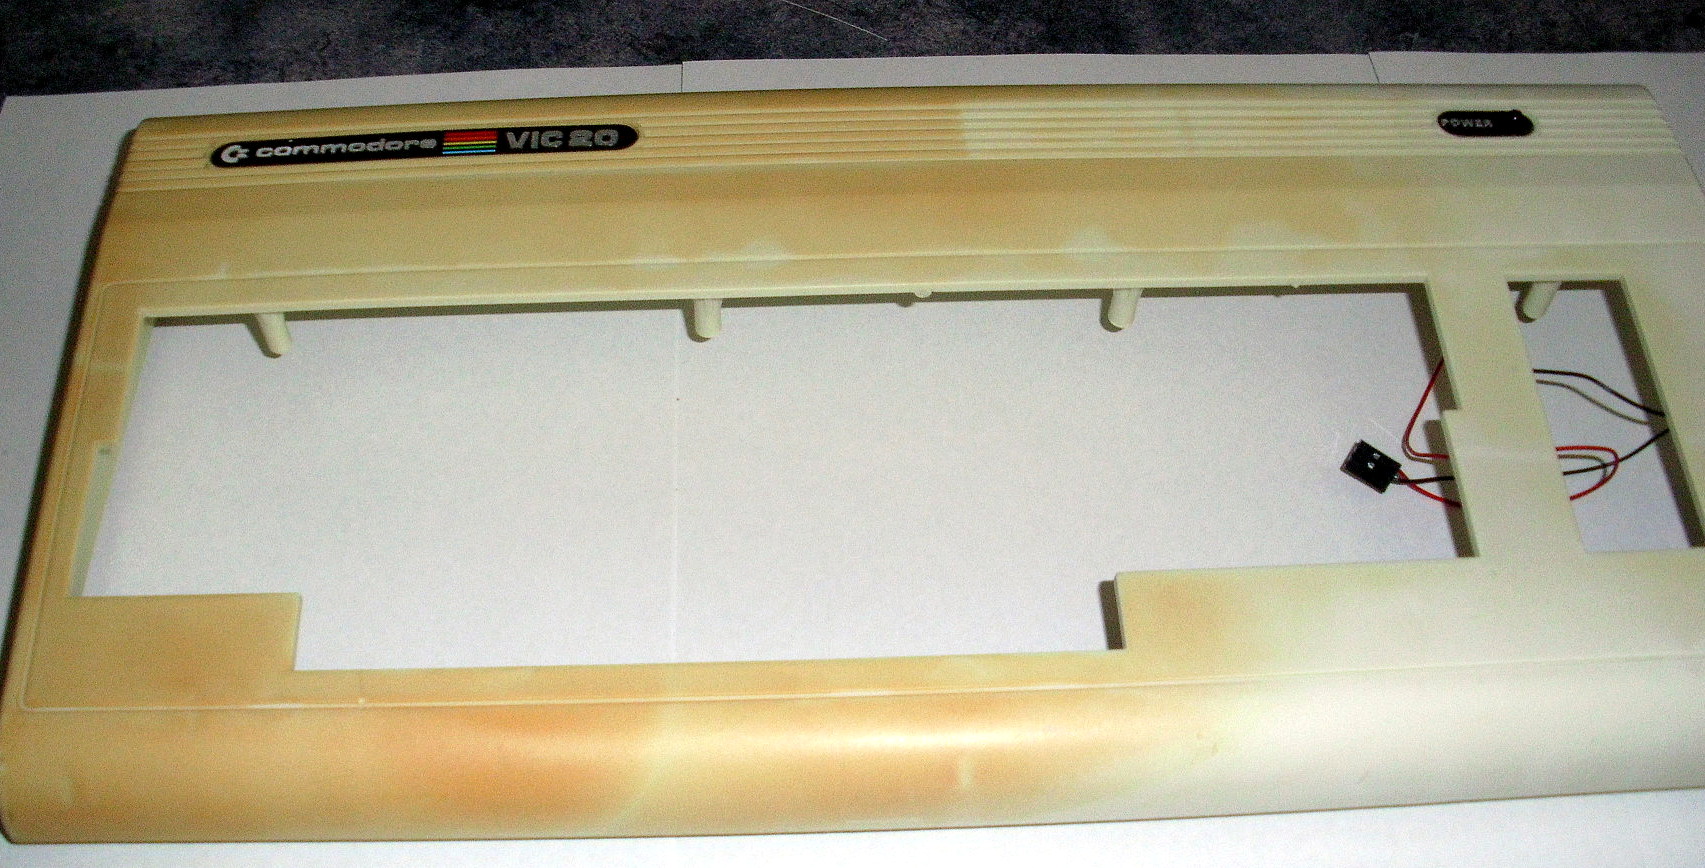
Below is a badly yellowed VIC-20 case before treatment. Note variations in discolouration.
Below is the same VIC-20 case after treatment.

Using this method ensures that that the effect is even over the entire object. Unfortunately results can sometimes still be patchy. Some people have noted some areas can get a patchy, chalky look to them.
This is visible in the VIC-20 case shown below. Note the rectangular darker area. A label had previously been there, which I had removed before retrobriting. As you would expect there was no yellowing under the
label, and as a result, this area exhibited no change after the Retrobrite treatment and was not chalky. Given that the label would have protected the plastic surface underneath, I suspect that the surfaces that were
not protected by the label had already been damaged in some way. Long term exposure to heat along with UV light is well known for damaging plastics, and it is quite likely the surface was degraded, possibly with microscopic holes and fissures invisible to the naked eye. This would increase the surface area, increasing exposure to oxygen in the air. In addition, more volatile components of the plastic could have evaporated over time, causing changes to the chemical balance of the plastic. These changes could make the plastic react differently to the Retrobrite, causing the uneven, chalky result. On the other hand, it's also quite possible the chalkiness is already there and is masked by the yellow discolouration.
Another source of patchiness can be caused by the very slight variations in the texture of the plastic caused by the injection moulding technique used in the manufacture of the item. Sometimes if you closely examine an item made by injection moulding, you can see these slight variations, looking at the same location on the back, you can see a patch of rough or raised plastic. This is where the melted plastic was injected into the mould. It seems this slight variation can be sometimes made more visible by the retrobrite process.

Another factor to bear in mind is the original colour of the item. Darker items tend to be more prone to exhibiting chalkiness - or at least its more noticeable. White or very light cream or beige is reasonably resistant. So, if you're retrobriting something that is grey - like the grey keys from an Amiga keyboard, you will need to limit the soak time to the minimum needed to get the desired result. The other cream or white keys can stay in pretty much as long as you desire. In order to test this, I actually soaked a broken and yellowed Amiga 500 case for a whole month. When finished, it did look a little chalky, but was still way, way better than the original cheese yellow colour
Using sunlight only
Another method that can reduce yellowing is to simply expose the item to sunlight. Obvious advantages to using this method is that the item does not need to be soaked in hydrogen peroxide solution, eliminating the risk of uneveness. The item also does not need to be dismantled. On the other hand, it is a lot slower and less effective than using peroxide. In my tests, it took three days of exposure to Australian summer sunshine to obtain maximum yellow reduction, and the item was still noticably yellow. I suspect that plastic formulation may have an effect as I have seen pictures of other people using this method and getting better results. I think that this would be an ideal way to 'refresh' an item after being retrobrited previously. Simply expose it for a day once a year, and it should stop the yellowing from coming back. For obvious reasons you will need to thoroughly clean the surface and remove any unwanted stickers before exposing to sunlight.
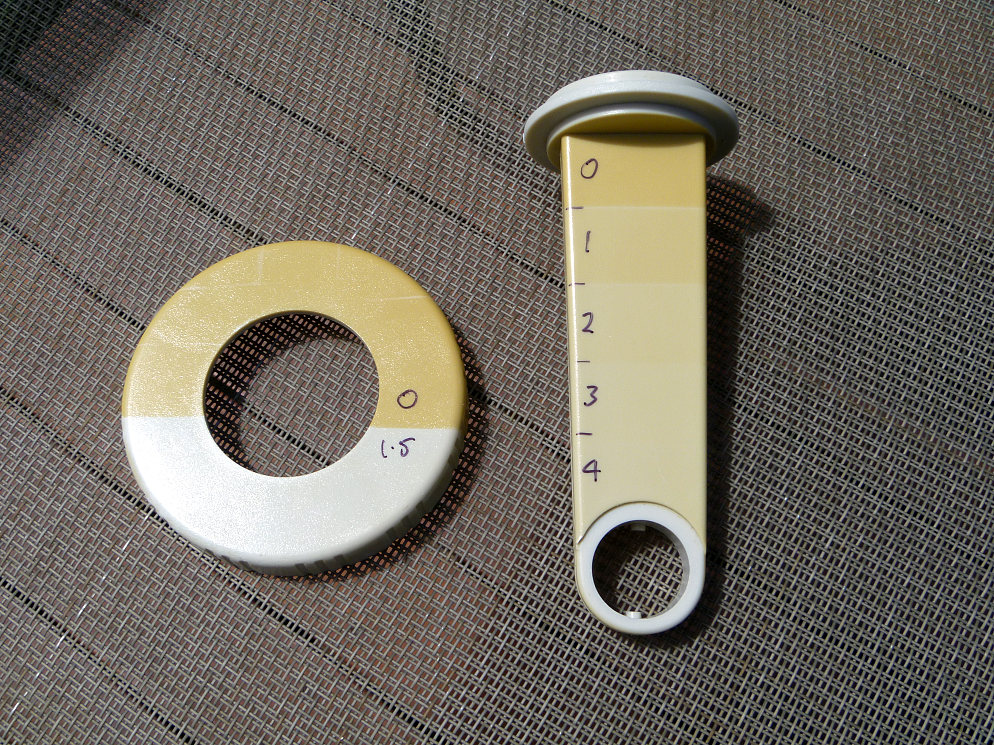
The image below shows two items, made from the same plastic and with the same amount of yellowing. The ring on the left was retrobrited in the usual way, soaking in a laundry whitener solution while exposed to sunshine for 1.5 days. The mounting post on the right was exposed to sunshine only. It was covered in strips of opaque black plastic tape. After each days exposure, a strip was removed, until the whole item, with the exception of the zero strip, had been exposed. You can clearly see that the effect reached a maximum at three days. Any further exposure provided no more improvement. You can see the original colour of the plastic in the inside ring at the bottom, which matches with the colour achieved on the item on the left that had the laundry whitener treatment.
Is it a permanent fix for yellowed plastics?
No. While Retrobrite reverses the effects of plastic oxidation, it does nothing to prevent it happening again. Below is the same VIC-20 case 5 years after the retrobrite treatment. It is clearly becoming yellowed again. Given that heat, light and oxygen are all involved in the yellowing process, attempts have been made to prevent this happening again. Methods tried include storage in dark areas and painting the item with lacquer to protect the item from oxygen in the air. So far these have been unsuccessful. Until some more time has passed, and we get more results from further experimentation, I believe the best solution for items becoming yellowed again is to repeat the retrobriting. Perhaps simple exposure to UV sunlight once every year or two may be enough to 'freshen up' the item.

Some people are worried that Retrobrite or the UV light used in the process can make the plastic brittle. To make an item brittle would require that the whole thickness of the plastic needs to be degraded. UV light can only do this if the item is transparent or translucent. Hydrogen peroxide can only do this if the item is porous and can be soaked right through. The standard ABS plastic used in computer cases is opaque and waterproof.
The real cause of brittleness is heat and age. Most plastics contain plasticisers that are chemicals that help make the plastic pliable. They tend to be volatile to a degree, and after a long period of time they can evaporate out of the plastic, making it brittle. I found that out myself by making the mistake of storing some A500 cases in a hot steel shed for several years. Not only were the cases a bright cheese yellow, I accidentally dropped one and it shattered. This was before I had a chance to try and Retrobrite it.
Back to main Amiga page.
Introduced 19th August 2015. Last updated 19th February 2024. Version 1.2