Overclocking the Vortex Golden Gate 386SX/486SLC2
This PC Bridgeboard came in three main versions, a 386SX at 25MHz, a 486SLC at 25MHz, and a 486SLC2 at 50 MHz. They were somewhat more modern than the Commodore A2386, and had an IDE controller built in, along with supporting up to 16MB of 30-pin SIMM memory. I have a 386SX version, so this document will initially describe how to overclock that. I will also describe how to upgrade this card to a TI486SXLC2, which is a similar but higher performance chip to the 486SLC2 version as originally used by Vortex.
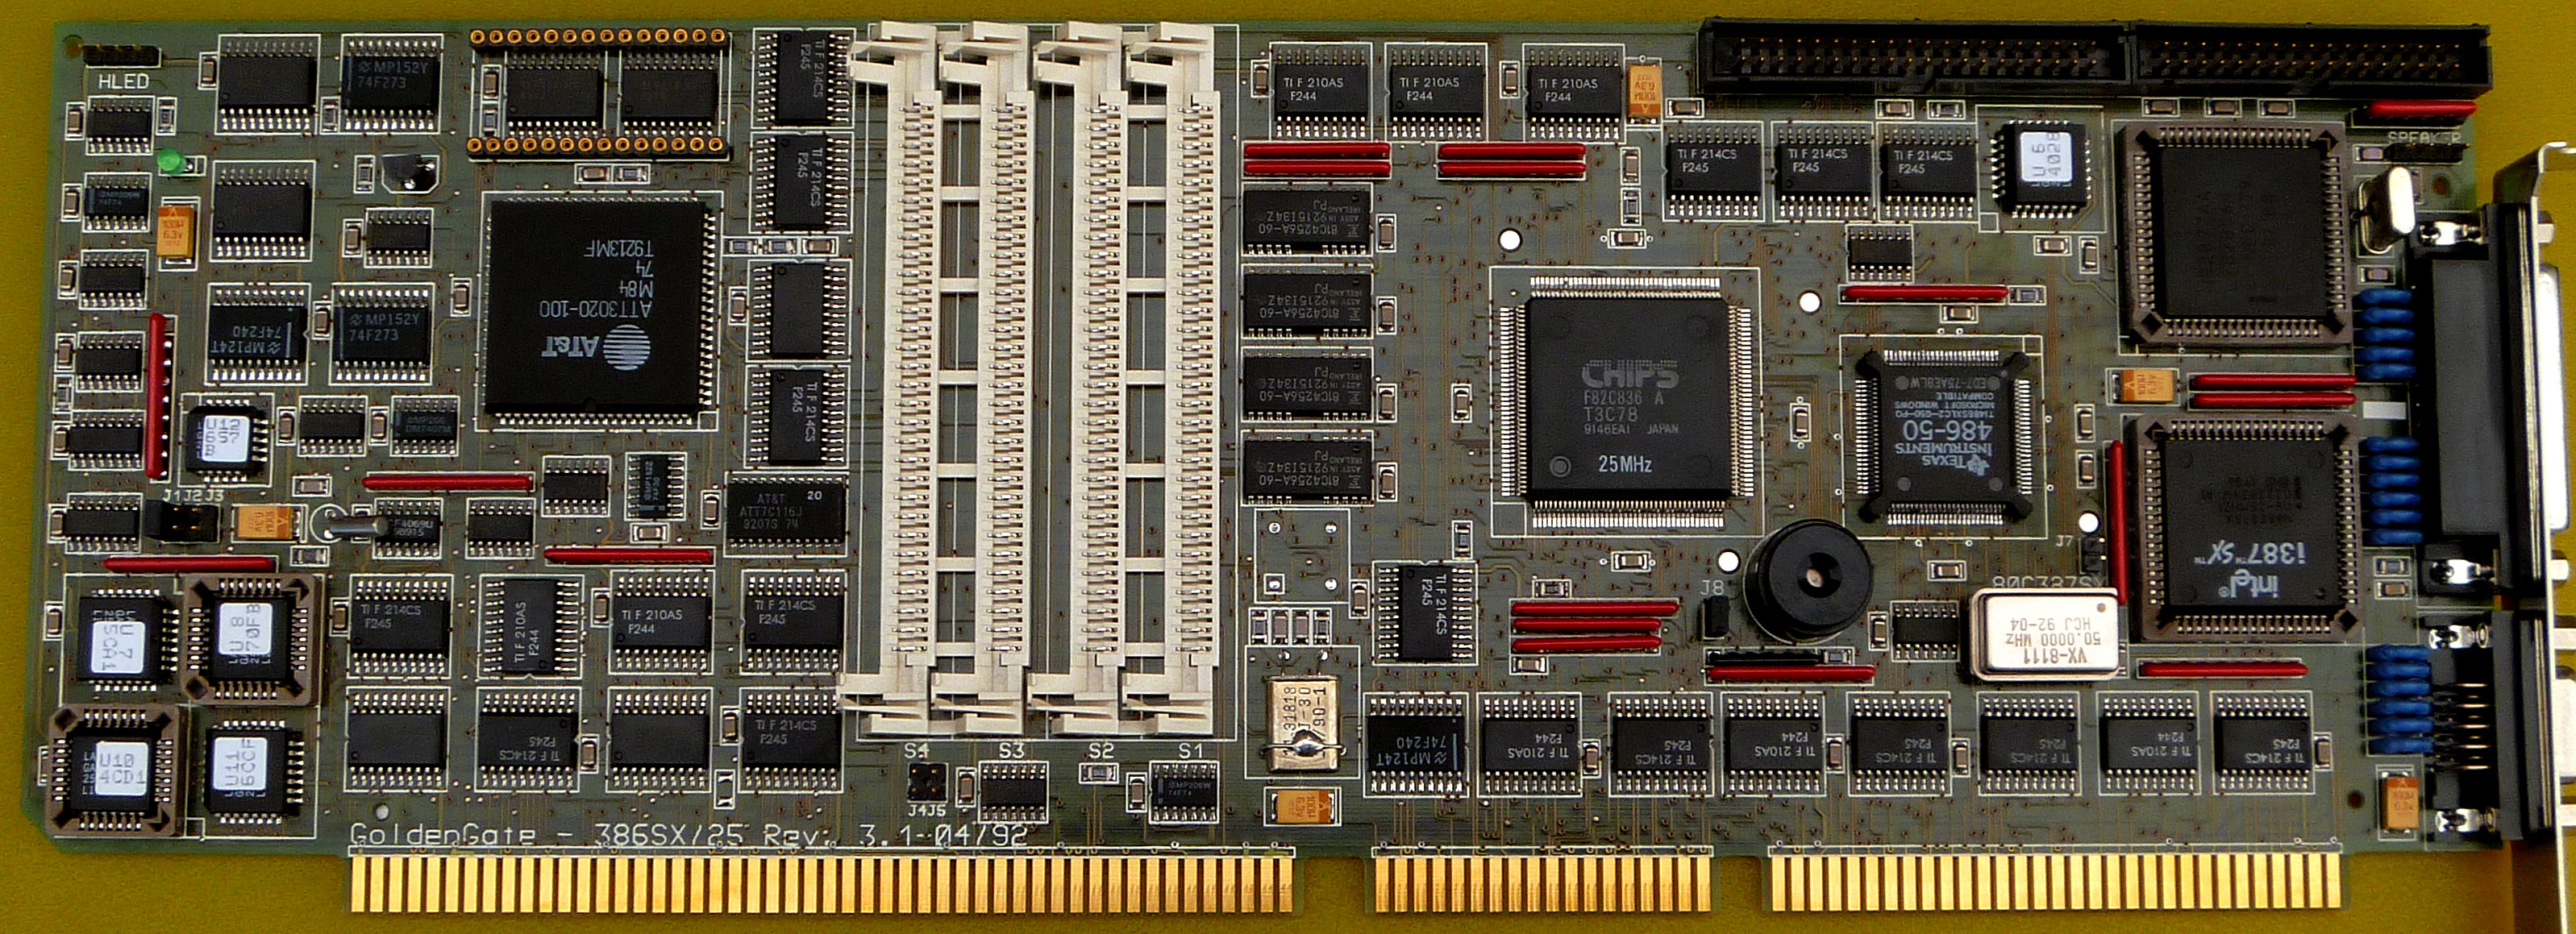
Below is a Golden Gate 386 card that has had its 386SX CPU replaced by a TI486SXLC2, before the heatsink and fan has been added.
Reliability issues.
These cards had a reputation for being a bit flaky, though usually once set up properly, they performed well. For example, some users noted that they were better in the top slot in an Amiga 4000. In my case, when testing in a standard A4000, I found it was more reliable in the bottom slot. Further investigation revealed that the 5V supply on the Golden Gate was closer to 4.75 V in the top slot, increasing to about 4.8V in the bottom slot. The board does seem to be a bit of a power hog, many of the TTL chips on it get quite warm, so its no surprise the 5V supply got pulled down a bit. I would advise making sure you are getting at least 4.9V on the 5V supply of this board to ensure reliability. Ensure all power connections are good and clean, including the lead and plug from the power supply to the motherboard. To be totally sure you could solder a Molex connector to a handy 5V and ground point (the +5V and ground connections on the crystal oscillator is a good place), and then plug this connector into an unused drive power connector from the power supply. It goes without saying, don't mix up the 5V and 12V connections!
The Golden Gate is also rather fussy with SIMM type. You need the type that has 9 chips on each SIMM (8 bits + parity). Any other configurations will either not work, or may be unreliable. Especially the later 2 or 3 chip variants. Preferably these SIMMs should also be 60nS so the wait state can be turned off for greater speed.
If your Amiga has an 020 or better processor, don't forget to turn off caches when running this card. If your CPU has an MMU, you can use MMUlibs (built into OS3.2, or available on Aminet) which will turn off caching for memory areas used by the Golden Gate. Also, don't forget that this card uses some ZII memory space, so bear that in mind if you have a ZII RAM expansion and/or graphics card installed.
Starting out
Once you have got any possible power or RAM issues sorted out, you can then work on improving the speed. As in other early PCs and Bridgeboards, one easy method is to reduce the amount of CPU time used to refresh the RAMs. Early PCs were designed at a time when dynamic RAMs had to be refreshed every 15nS. More modern memory can go for a lot longer before needing a refresh. This timing can be changed with a DOS program called calcqf, which can easily be found on any public domain or PC shareware site. This MS-DOS utility will calculate the best refresh rate and generate an executable file called "qfresh.com" which can be executed in autoexec.bat. Refer to the documentation with the program. Normally Qfresh will give around 5-6% extra speed, but in the case of the Golden Gate, there is only a slight improvement. Possibly because the memory controller in the Golden Gate already refreshes RAM at close to the optimal rate or perhaps its less demanding on CPU resources.
Overclocking the 386SX
As standard, a 50MHz oscillator is located near the CPU. The clock from this is divided by 2 to give the CPU clock of 25 MHz. Carefully remove this oscillator and solder in a 14 pin DIL IC socket with the unused pins removed. This will allow you to easily change the oscillator. Unfortunately, attempts to overclock were not very successful. I was able to successfully change the oscillator to 52MHz, corresponding to a CPU speed of 26MHz. I tried a 54MHz oscillator, corresponding to a CPU speed of 27MHz, but unfortunately, this made the system very flaky. It should be noted that the ISA bus clock is derived from this clock too, and some ISA cards may not like an overclocked ISA bus. A setting is provided in the BIOS setup screen to run this bus at a slower speed if required. The limitations I found with overclocking the Golden Gate did not appear to be because of the ISA bus, at least with the cards I had in the ISA slots.
A word about processor and BIOS versions.
Before we start with changing or upgrading the CPU, it is best to learn about the different BIOS versions that are required for each different type of CPU. Unlike almost all standard PCs or Bridgeboards, the Golden Gate's BIOS is a file, called glib.library, which is loaded from the Amiga. There are three main variations of glib.library, one for each processor type. For example, the install disk that came with my 386 Golden Gate was labelled version 1.08, and it contained glib.library version 2.20. This library does not support processors above 386SX. There may be other sub versions of this disk, as I have seen a disk with a version 1.0 label on it.
The 486SLC version of the Golden Gate install disk is labelled version 1.10, containing glib.library version 2.21. This library recognises if there is a 486SLC installed, and it activates the cache built into that processor. It is also backwards compatible with the 386SX.
The 486SLC2 version of the install disk is labelled version 1.31, containing glib.library version 3.2. This library recognises if there is a 486SLC2 installed, and activates the cache built into the 486SLC and 486SLC2 processors. There is also an entry in the PC boot screen that indicates whether 'fast mode' is on or off. Because I don't have an actual 486SLC2 card, I don't know if 'fast mode' is automatically enabled if a 486SLC2 is present, or if it can be selected in a BIOS setting. As with the other versions of glib.library, it is backwards compatible with the other processors. In the case of having a TI486SXLC2 installed, both the cache and 'fast mode' are inactive, presumably because the BIOS can't recognise this processor. Instead, these can be activated by use of appropriate software (see below). This version of the Golden Gate install disk can be downloaded from here.
A word about hardware versions.
There are some minor differences between boards supporting the three different processors. Apart from the processor itself, there are two GAL chips which are programmed differently to support whichever processor is present. These are U8 and U10. For the 386SX board, U8 has a checksum of 70FB, and U10 has a checksum of 4CD1. I am not 100% sure of what is in the 486SLC board, but I think U8 is 70F9, and U10 is 4CD1 (the same as the 386 board). For the 486SLC2 board, U8 is 70F9 and U10 is 4CD8. The board will not work if the processor does not match up with the correct GALs. Fortunately, there is a hacked glib.library which can be used on boards that don't have the correct GALs for the processor in use. There is a link to it below.
One further hardware difference is that the 486SLC2 is provided with a CPU fan. It is simply glued on top of the CPU, without a heatsink. If installing a TI486SXLC2, I strongly advise fitting a heatsink and fan on top of the CPU as it gets quite hot for reasons explained below.
Upgrading to a 486SXLC2
PCs and bridgeboards that use the 386SX CPU are rather like Amigas that use the 68000. Internally 32 bit, but having a 16 bit data bus. In order to upgrade these to a 486, a special version of the 486 needs to be used which also has a 16 bit data bus. The 486 version of the Golden Gate uses one of these processors, either a Cyrix 486SLC at 25 Mhz, or a 486SLC2 which is clock doubled to 50MHz. Even if you already have a 486SLC2 version, you can upgrade to a Texas Instruments 486SXLC2 as it has 8KB of cache memory compared to the 1KB in the original 486SLC2.
These upgrades can be either done via a module that clips onto the 386SX, or by removing the CPU from the Golden Gate and soldering on a 486SXLC2 chip. My first attempt was to use an Evergreen 'Rev to 486' clip on module. This has an IBM clock tripled 486 CPU that will run at 75MHz, and will potentially give the best performance. Unfortunately this chip refused to work on the Golden Gate. I was unable to determine why, but I suspect the Golden Gate glib.library (BIOS), both in its standard and patched versions didn't like this somewhat non standard chip.
The next 486 chip I used was a Texas Instruments 486SXLC2. This has already been successfully used on the Golden Gate by other users. The clip-on version is called 'Make-It 486'. Unfortunately I don't have one of these, but I do have the CPU on its own that I could solder in place of the original 386. There is however, a potential disadvantage. While most TI 486SXLC2 chips have 5V tolerant input/output lines, the chip itself is actually powered from 3.3V, and not the 5V that is standard on the 386SX. The clip on modules have a voltage regulator that takes care of this. Fortunately, the technical data on this chip quotes a maximum power voltage of 5.5V, so it can be used on the Golden Gate with its 5V supply. Before doing so, it is wise to check the 5V supply on the board to make sure it does not exceed 5V. It is preferable it is slightly lower, around 4.9 to 4.95V. But bear in mind as previously mentioned, the Golden Gate may be a bit flaky if operated on too low a voltage. Because this chip is operated fairly close to its absolute maximum voltage, it runs hotter than normal, so it is strongly advised to attach a heatsink and fan. The official 486SLC2 version already has a fan installed anyway. It is worth noting that I have been using this chip in an overclocked Commodore A2386SX board at 5V for over 25 years with no problems. One final thing - The pins on thse chips are very fine and delicate, and I would strongly advise that only highly experienced people should attempt to remove the old CPU and solder on a new one.
If you upgraded your 386SX Golden Gate to a 486, you will then need to replace the existing glib.library with a patched one which can be downloaded here. You can either put it in the install disk before installing the software, or you could replace the glib.library in your existing Golden Gate installation in your Amiga. Note that the earliest version of the Golden Gate 386 disk (version 3.08 or earlier) is not compatible with 486 processors, so you will need to use 3.10 or 3.13.
Once the 486 chip is installed, along with the patched glib.library, you will need to activate the cache and clock doubling. I found that using glib.library 2.21 already activated the cache, but not the clock doubling. Using glib.library 3.2 had cache and clock doubling inactive, presumably because it does not recognise the TI486SXCLC2. In any case, its not a problem as these extra features can be activated by software in autoexec.bat. The appropriate files are found here.
Unlike the A2386SX bridgeboard, the Golden Gate appears to support the 'flush' pin provided on the 486SLC (and 486SXLC2). This means that any DMA reads from memory will not cause the cache to be needlessly flushed compared to the 'flush cache on hold' method normally used which flushes the cache on both DMA memory reads and writes. Using the 'flush' pin on the CPU results in a worthwhile speed improvement. These settings can be found in the TI486SXLC2 setup software linked above.
Overclocking the 486SXLC2
Once the 486SXLC2 is installed, and a good fan & heatsink is attached, we can try overclocking. Given the poor results when trying to overclock the 386SX, I wasn't expecting much. In fact it did slightly better than before. Whereas the maximum oscillator frequency when using a 386SX was previously 52MHz (corresponding to 26MHz CPU speed), I was able to get reliable operaton at 54MHz with a clock doubled 486SXLC2 chip in use. Still far below what it could do in an A2386SX Bridgeboard where I got 62MHz (without FPU).
Results.
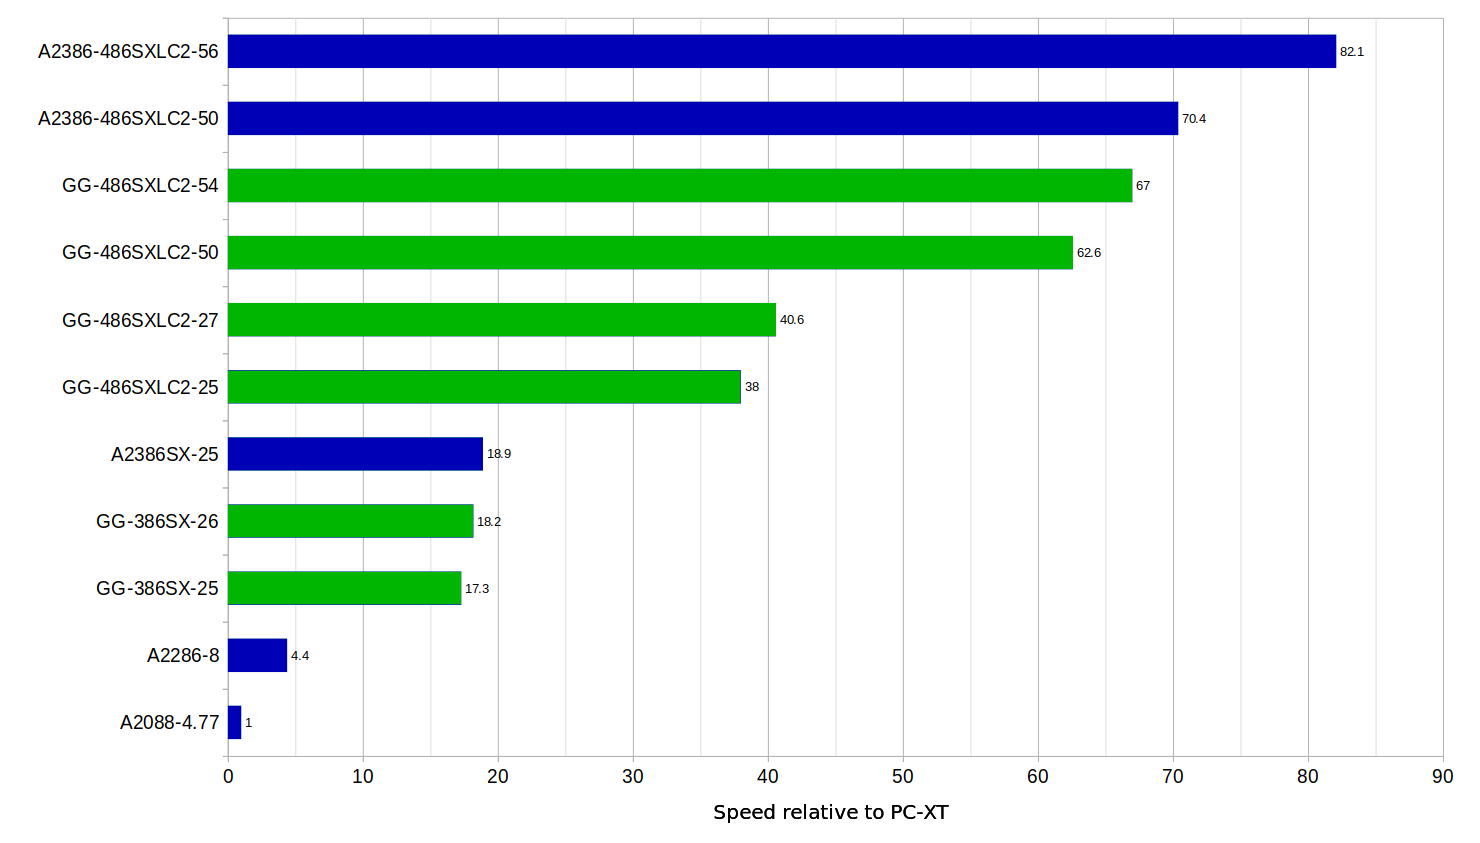
Below are some benchmarks of various options using Norton Sysinfo, shown as multiples of the speed of a standard 4.77MHz PC-XT (and A2088 Bridgeboard). A few other Commodore Bridgeboards are included for comparison. Golden Gate results are shown in green. You can see the A2386SX has superior performance, possibly due to its support of pipeline mode, as I found deactivating pipeline on the A2386SX results in very similar performance to the Golden Gate. Click on image for an enlarged view. These benchmarks do not show FPU or VGA performance.
ISA bus performance.
The ISA bus is clocked at a sub multiple of the main 50MHz clock, and is normally 8MHz, which is standard for an AT-ISA interface. The BIOS setup allows it to be set to 'fast' which increases the clock to 10MHz, which may not be supported by some cards. Unlike the Commodore A2386SX bridgeboard, it is not possible to do the hack where the ISA bus crystal is removed and a 'bus master' type VGA card is installed, resulting in a tremendous speed boost for VGA data transfer rates. In this case using a Diamond Speed Star Pro VGA card in an A2386SX with the ISA clock crystal removed can give over 9MB/sec data rate over ISA into the VGA card. In the case of the Golden Gate, with the same card, VGA performance tops out a bit over 5.7MB/sec. I also tried a Diamond Speed Star 24X, and this card achieved 4.4MB/sec. For reference, an ordinary VGA card tops out at 3MB/sec or less. One odd thing I noticed is that the bus speed setting in the BIOS did not appear to make any difference to the data transfer rate on any of the VGA cards I tried.
Back to main Amiga page.
Introduced 12th March 2024. Version 1.0