Overclocking the A2386SX Bridgeboard
The Commodore A2386SX Bridgeboard contains an Intel 386SX CPU at either 16, 20 or 25 MHz. This article deals specifically with the 25MHz version although the other versions should also be overclockable. Given that current PCs now have vastly faster CPUs compared to the now very elderly A2386SX, any speed improvement is most welcome. Fortunately there are many ways to speed up a Bridgeboard, and if they are all utilised, the A2386 can actually exceed some performance parameters of a good 486. In fact the hard drive access speed on my Bridgeboard was actually faster than that of the Pentium 225MMX I had at the time. If you haven't done so already, check out Sebastien Boisvert's excellent Bridgeboard Guide . It contains just about everything there is to know about Bridgeboards. Also check out BBCpuUpgrde on Aminet It contains a wealth of information on how to upgrade your Bridgeboard CPU, uncluding details of the hardware cache flush method.

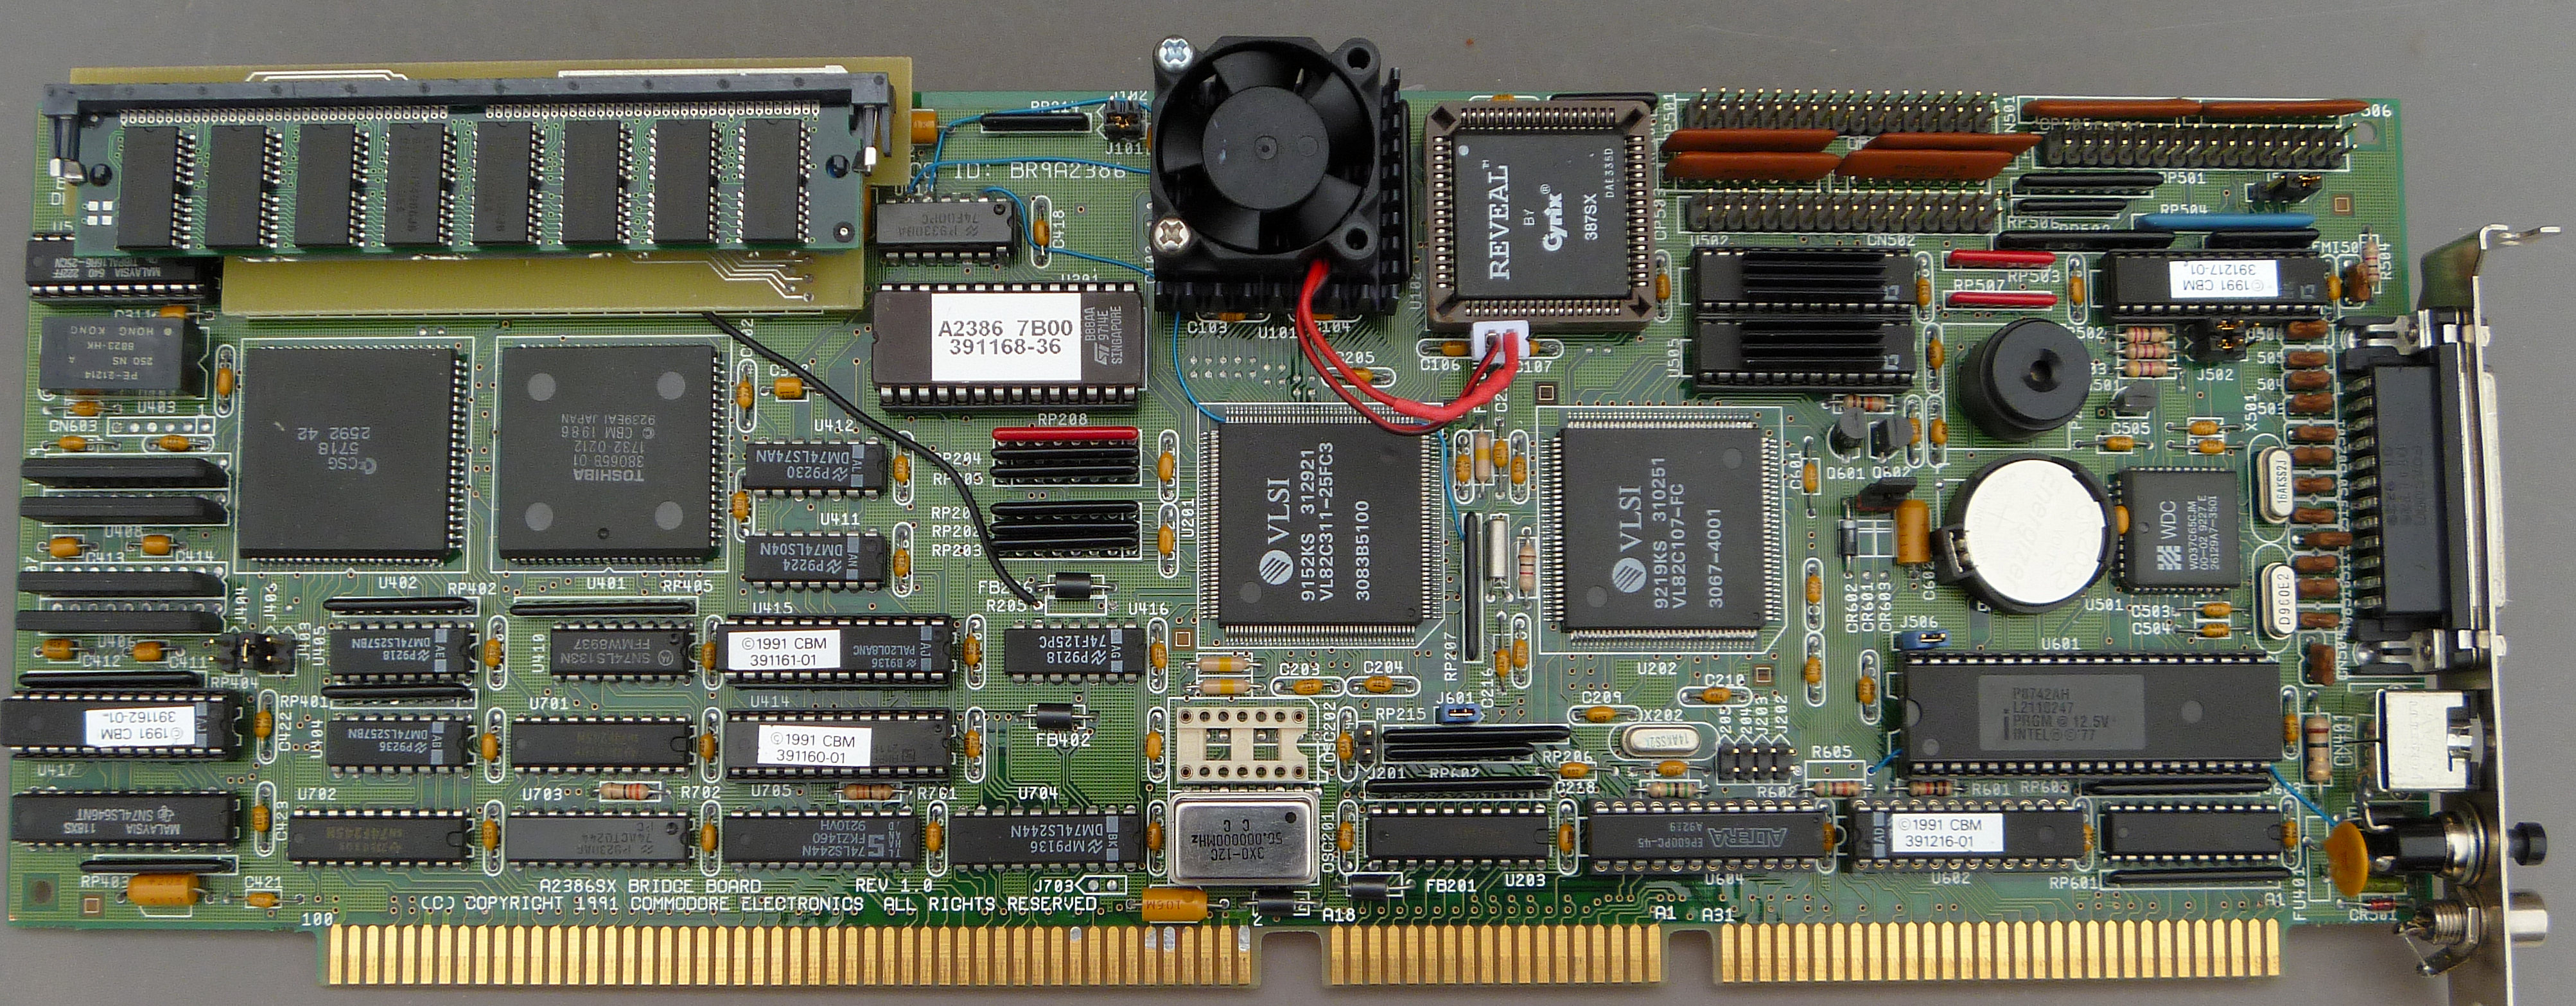
Below is my heavily hacked A2386SX Bridgeboard. Added features include: TI486SXLC2 CPU, with fan and heatsink. 16MB of SIMM memory. Hacked BIOS to support 16MB memory. Addition of hardware cache flush. NiCd battery replaced with CR2032. Reset button on back panel. ISA bus crystal oscillator removed.
Starting out
Before you reach for the soldering iron, there are five ways to start gaining speed. Firstly, referring to the layout above, make sure the pipeline jumper, J101 is fitted. This gives about a 10% speed boost. The next thing to do is to reduce the amount of CPU time used to refresh the RAMs. Early PCs were designed at a time when dynamic RAMs had to be refreshed every 15nS. More modern memory can go for a lot longer before needing a refresh. This timing can be changed with a DOS program called calcqf, which can easily be found on any public domain or shareware site. This MS-DOS utility will calculate the best refresh rate and generate an executable file called "qfresh.com" which can be executed in autoexec.bat. Refer to the documentation with the program. Qfresh will give around another 5-6% extra speed. The next thing to do (if you are unfortunate enough to have to run Windows) is to get some extra memory. It is possible to fit 16MB of SIMM memory to a Bridgeboard with an ingenious hack. Check it out in Aminet. Video speed can be increased by fitting a modern ISA VGA card which has an ISA bus master feature. The best of these cards is the "Diamond SpeedStar Pro" Fitting one of these can double your video speed, although it is possible to get even more performance as you will see below. Finally, get a cheap ISA IDE controller card and use a dedicated IDE hard drive. The speed improvement compared to using a shared Amiga drive is astounding. These IDE controllers also include serial and parallel ports as an extra bonus.
Upgrading the CPU
One of the best ways to speed up a Bridgeboard is to upgrade the CPU to a 486. Again, the Bridgeboard FAQ has all the details. I have tried two different upgrade modules, one based on a 50MHz TI486SXLC2 chip called "Make-it 486" and the other on a 75MHz clock tripled IBM chip called the "Rev to 486". For use with Windows, I found that the Make It 486, although only clock doubled to 50MHz, was much faster than the Rev To 486. This is because of its much faster memory and ISA bus speed. One of the reasons for the difference in memory performance is that the Rev to 486 does not seem to support pipeline mode (refer to jumper j101). On the other hand, the Rev to 486 does have much greater raw processing power, so if you have an unaccelerated VGA card, and are using DOS, this would be the chip for you.
These CPU upgrades are designed to clip over the top of the existing 386SX chip. There can sometimes be problems with bad contacts. In my case I actually removed my 386SX chip and soldered a
TI486SXLC2 chip directly to my board. Don't do this unless you have very good soldering abilities as the pins and PCB pads are very fine and easily damaged. Also be aware that some versions of these upgraded chips
have different voltage requirements to the original 5 volt 386SX chip. The clip on boards have voltage regulators that take care of this, but if you are directly soldering the 486 chip onto the Bridgeboard, you
will need to be aware of which version chip you can use.
For example, the TI486SXLC2B-050-PJF variant is a fully 5 volt chip and can be safely soldered onto the Bridgeboard. The more common TI486SXLC2C-G50-WN variant is 3.3 volts, with 5 volt tolerant inputs. Soldering this one directly to the Bridgeboard will result in the chip being powered by 5 volts instead of the correct 3.3 volts. Given that the official maximum allowable supply voltage for this
version is 5.5 volts, you can operate this chip directly soldered in, however, I would advise the following: Check the 5 volt supply on the Bridgeboard, and make sure it is no more than 5.00 volts. It is preferable that it be a little less than this. In my case, I have 4.86 volts on mine, which would be ideal, as it is not too low as to cause stability problems, while still giving a greater safety margin. Running
this chip at 5 volts makes it rather warm, but not excessively so. However, if you want to overclock this chip past the rated 50MHz, I would advise gluing a heatsink on top with a small amount of airflow provided. I should mention that I have been using one of these chips on my Bridgeboard for 25 years with no problems.
Controlling 486 features
The new features provided by these 486 upgrade chips will need to be activated by software, otherwise there will be no performance improvement at all. Both Cyrix and Texas Instruments provide software that can be used to configure the caches and clock doubling. Software intended for use with the 'Make-It-486' and its TI486SXLC2 chip can be found here. Another alternative is to alter the Bridgeboard's BIOS so that the features are already activated without the need for loading drivers in autoexec.bat. A modified BIOS is now available for the new recreated and improved A2386 board that is currently under development. The new BIOS will also work on existing modified Commodore A2386 boards. There are various versions that expand memory to 16 MB, turn on cache and clock doubling for the 486 CPUs, and as well they contain the XTIDE BIOS which allows the use of modern large hard drives. One variant will clock the ISA bus at 16 MHz for VGA cards only, and reduce it to 8 MHz for other cards. Ideal for cards that don't like overclocked ISA. It can be found on Github.
Optimising cache management.
It is important to ensure that the contents of the CPU cache are exactly the same as the contents of the RAM it is caching. Any mismatch will cause a crash. This can occur during DMA writes to RAM. Normally this is prevented by software control by flushing the cache any time there is DMA access to memory. Unfortunately this software method also includes DMA reads, which do not invalidate the cache. Flushing cache on reads causes a needless slowdown. While the CPU has a special 'flush' pin that can be used to properly flush the cache on writes only, the A2386SX has no connection to it. Fortunately, it only requires a single 74F00 TTL chip and a few bodge wires to add this feature. Details on how to perform this modification can be found here on Aminet.
Using an FPU with a 486 upgrade.
Due to some quirks in the Bridgeboard design, usage of an FPU can sometimes be problematic if the clock doubling/tripling feature is enabled in your 486 upgrade chip. Some brands of FPU simply do not work. Others will work, but the amount of overclocking may be restricted. I tested six different brands/variants of FPU. On the left are three that worked, on the right are three that failed. Of the
working ones, the Cyrix one gave the best performance. Of course, all these FPUs will work if you have clock doubling turned off.

Overclocking the 386 CPU
The Bridgeboard uses standard 14-pin DIL oscillator modules. The nominal frequency is half that of the module - unless you are using one of the 486 upgrade chips in clock doubled/tripled mode. As usual it is best to fit a socket when changing the oscillator. The CPU oscillator is the one next to the ISA edge connector. Refer to the diagram above. Before I upgraded to a 486SXLC2 CPU, I tried overclocking the standard 25 MHz 386SX version and got a reliable 30MHz, using a 60MHz oscillator. At this speed it is suggested that a heatsink be glued to the top of the 386SX as well as the two PAL chips indicated on the above diagram in blue.
Overclocking with 486 upgrade.
The Make it 486 (or TI486SXLC2 if soldered directly to PCB) was able to be overclocked to 63MHz, using a 63MHz oscillator. Again, heatsinks are necessary. This result was without a 387SX FPU fitted. If the speed was increased past this point, I would occasionally get a corrupted BIOS error, which had to be cleared by removing the BIOS battery for a few minutes. I decided that 60MHz was the best overclock speed. When a 387SX FPU was added, the maximum overclock speed for all FPU brands was reduced to 56MHz, assuming usage of a compatible FPU as mentioned previously. The Rev to 486 refused to be overclocked at all, although I have heard of one user getting over 90MHz out of it! (in that case the oscillator needed would have been 60MHz). I did not try an FPU together with the Rev to 486.
Results
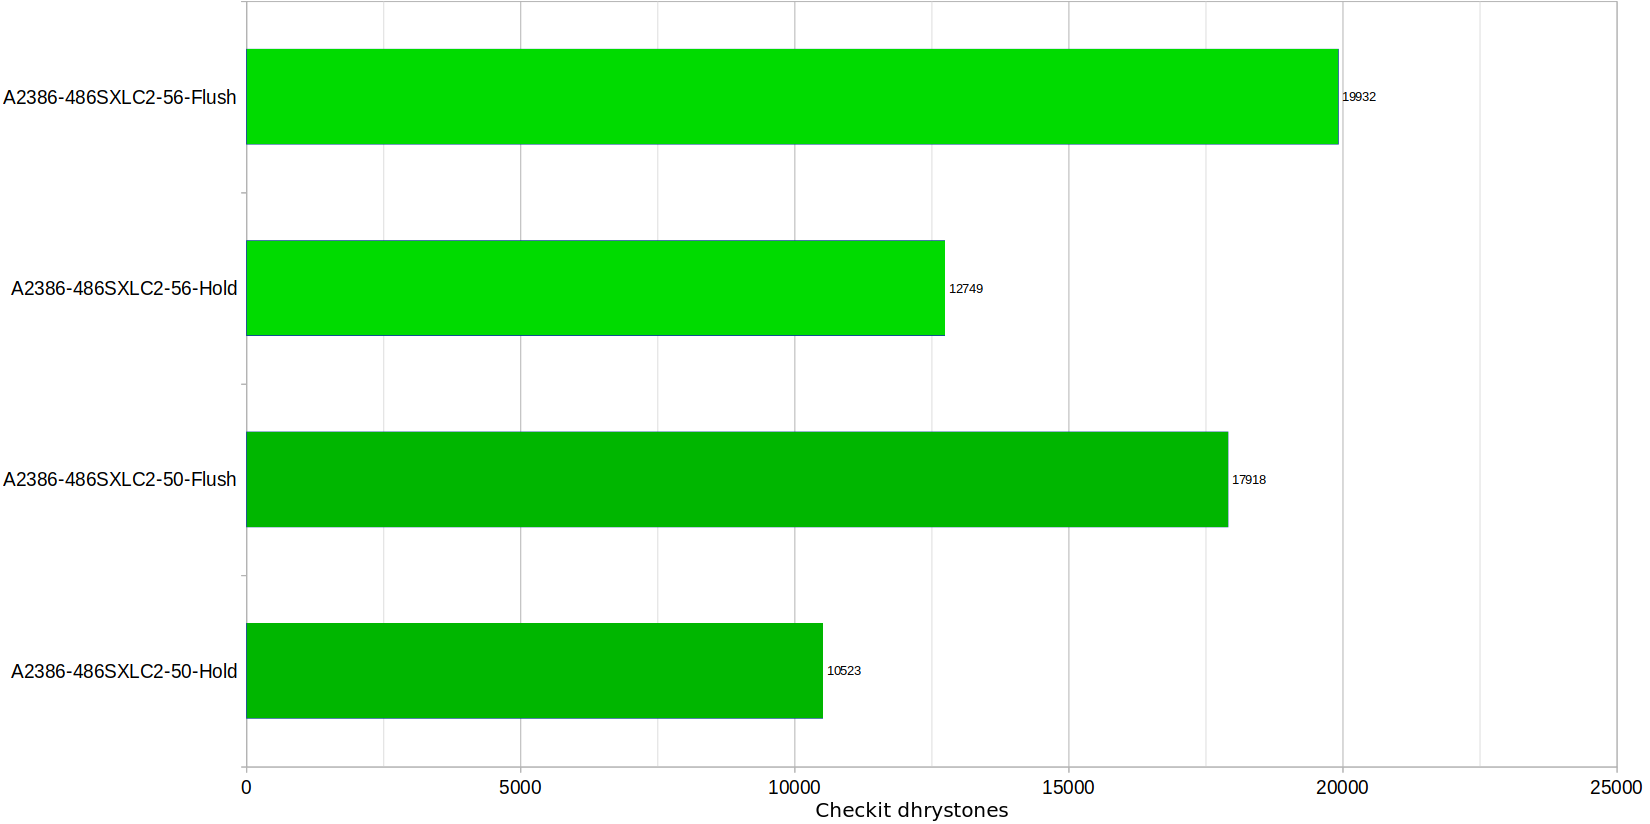
Below are some benchmarks of various options using Norton Sysinfo, shown as multiples of the speed of a standard 4.77MHz PC-XT (and A2088 Bridgeboard). A few other Bridgeboards are included for comparison. A2386 results are shown in green. Results are also shown for hardware cache flush (flush) and software cache flush (hold). While Norton Sysinfo is probably not the ideal benchmark, but as it was so widely used in very early PCs, I decided to use it here. Other benchmarks show greater differences between hardware and software cache flush. Click on image for an enlarged view. These benchmarks do not show FPU or VGA performance. I did not include results at higher speeds without FPU.

As an example of how a different benchmark shows cache performance differently, here is a graph using the 'checkit' benchmark showing cache performance. As before, it is comparing software vs hardware cache flushing, with the CPU at 50MHz and also at 56MHz. Possibly this benchmark has lots of DMA reads from RAM?
Overclocking the ISA bus
The Bridgeboard generates its ISA bus timing from one of three sources. When first powered up, and before Janus starts the Bridgeboard, the ISA bus gets its timing from the CPU oscillator. This is divided by six, so a 50 MHz CPU oscillator will give an ISA frequency of 8.3 MHz. Once the Bridgeboard starts, timing is obtained from the 16 MHz ISA oscillator, which is divided by two to get the standard 8 MHz ISA timing. A third option is when certain types of VGA card provide their own ISA clock. This is enabled by removing the ISA crystal oscillator. This VGA generated clock is 28.6 MHz, and is also divided by two to get a faster ISA clock of 14.3 MHz. Note that not all VGA cards will do this, especially the older ones.
While removal of the ISA oscillator gives a huge overclock to the ISA bus, more can be had by replacing the 16 MHz oscillator by one that is higher than 28.6 MHz. Going to 32 MHz will double the ISA bus to 16 MHz. The success of this, of course, is very dependant on what ISA cards you are using. A 33 MHz oscillator (16.5 MHz ISA) got no further increase in VGA performance, though the IDE controller got a small improvement. At 36 MHz, (18 MHz ISA), things started to fall over, both IDE and VGA started misbehaving. In an attempt to improve things, I replaced the 74LS245 bus transceivers on the IDE card with 74F245s, and this restored correct operation for both cards. Unfortunately VGA performance was no better than with the 32 MHz oscillator, so I stayed with 32 MHz.
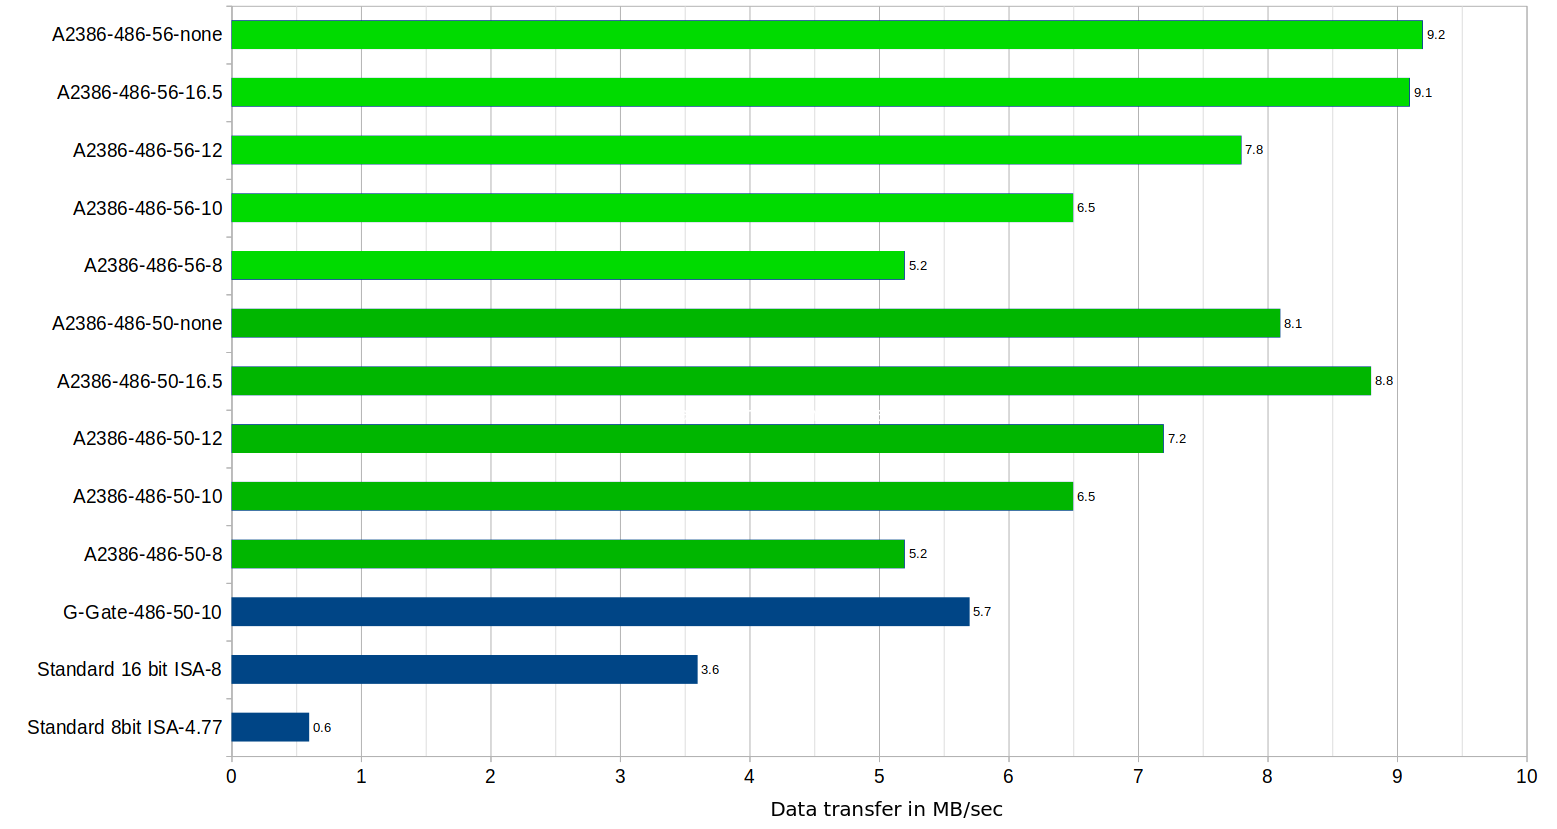
I used a benchmark program called 'Drhard' to get transfer rates into my VGA card (Diamond speedstar pro). The light green results are with the CPU at 56MHz, dark green at 50MHz. The ISA performance at 50 MHz without the oscillator is what I would expect for an ISA bus running at 14.3 MHz. Interestingly at 56 MHz, the ISA bus without oscillator was almost as fast as it was with a 32 MHz oscillator. I have no idea why this is the case. With this in mind, I still recommend using the 32 MHz oscillator, unless your ISA cards don't like running this fast.
ISA card transfer rates.
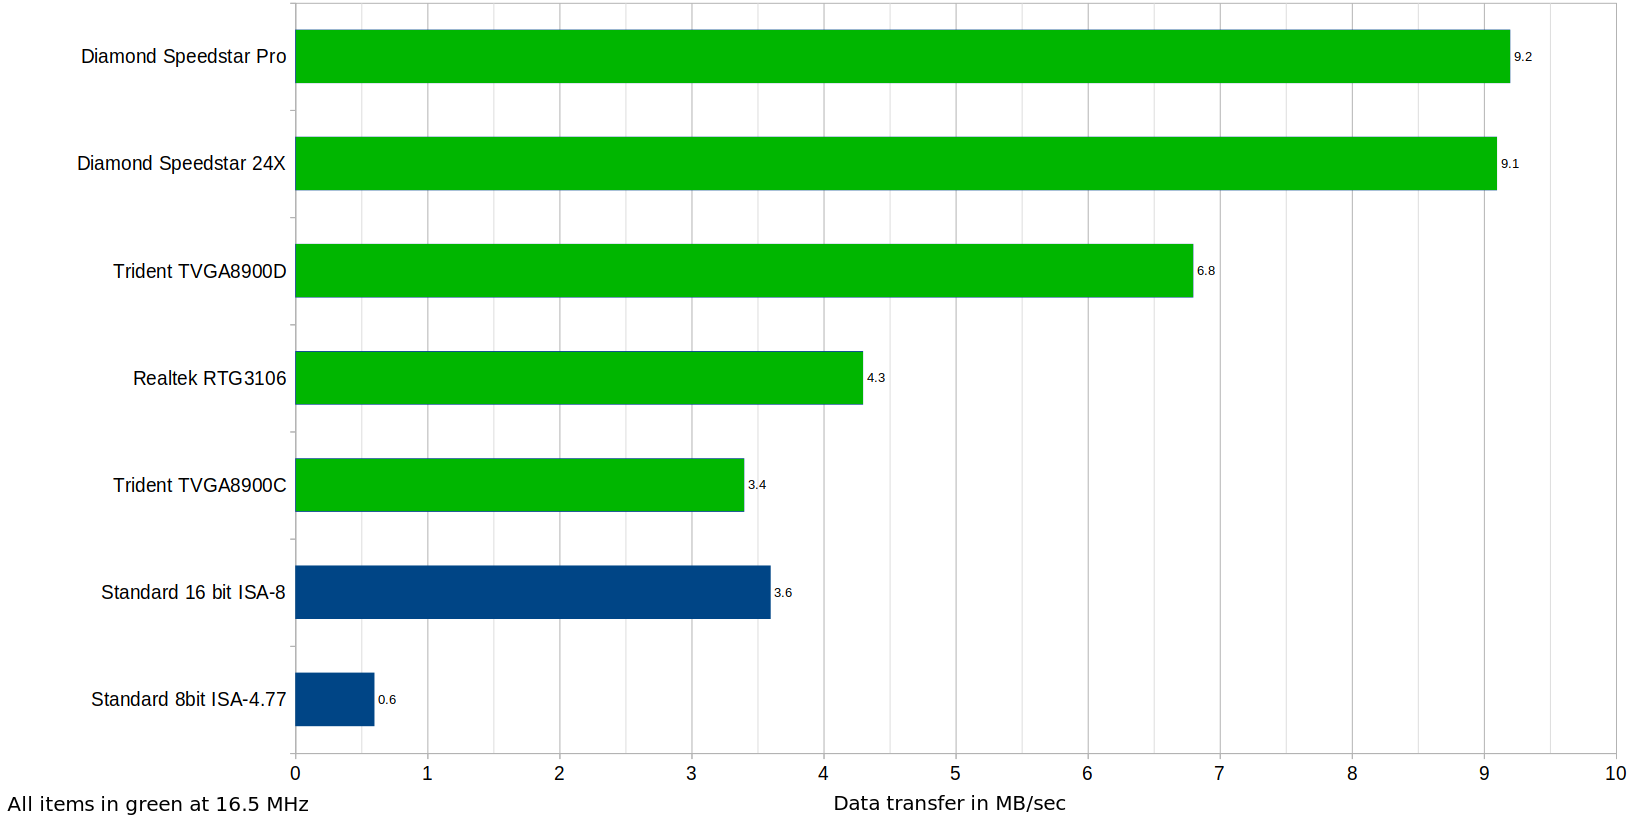
For completeness, I decided to include ISA bus transfer rates for a few ISA VGA cards I have. Note that this only measures data transfer to the card over ISA, it does not take into account the speed of the chipset on the card. All these benchmarks have been obtained with a 486SXLC2 CPU at 56MHz, and with the ISA bus oscillator removed, more or less equivalent to the ISA bus being clocked at 14.3 MHz. Some cards are 'no name' types, so I've identified them with the VGA chip that was used. It is worth noting that the TVGA8900C card gives pretty much the same transfer rate at whatever ISA speed is used.
It should be noted that I only tested these cards enough for a reliable boot, and for the benchmark to run correctly with no corruption noticed. I later tried the TVGA8900D card using 'Checkit' and there was some corruption on screen. I then tried this same card with a 32MHz ISA bus oscillator, and it failed to display anything at all. I also quickly tried the TVGA8900C card with the 32MHz oscillator, and it failed to work too. I then tried it with a 24MHz oscillator, equating to 12MHz ISA speed, and it then worked perfectly. Of course, as already noted, it exhibited no speed increase over the standard 8MHz ISA speed anyway. I'm not going to go down the rabbit hole of testing all these cards for the genuine maximum ISA speed in all situations, however, I have very extensively used the Diamond Speedstar Pro for 25 years at the maximum speed, and it has worked perfectly the whole time. It remains the card I recommend for the Bridgeboard. If you want to try any others, I advise thorough testing for both speed and reliability first.
Clock Division Ratios
386SX CLOCK=Oscillator frequency / 2
TI486SXLC2 CLOCK=Oscillator frequency / 2 or, Oscillator frequency x 1 (user selectable)
IBM486SXLC3 CLOCK=Oscillator frequency / 2, or Oscillator frequency x 1, or Oscillator frequency x 1.5 (user selectable)
ISA BUS FREQUENCY=Oscillator frequency / 2
Points to watch
* Keep the CPU and PAL chips cool - use a heatsink
* Some FPUs won't work if you are using one of the upgrade CPUs, unless you are operating without clock doubling or tripling enabled.
* Don't use a shared Amiga hard drive. Its too slow. Get a cheap IDE controller card and a cheap IDE or flash drive.
* Use Linux......or better still the Amiga! (Windows uses 30% of your CPU just to run itself).
* Watch the orientation of any oscillators you change. Getting it wrong will destroy the oscillator.
Back to main Amiga page.
Introduced August 7th 1998. Revised 23rd April 2026. Version 1.5.