Overclocking the A2088 Bridgeboard
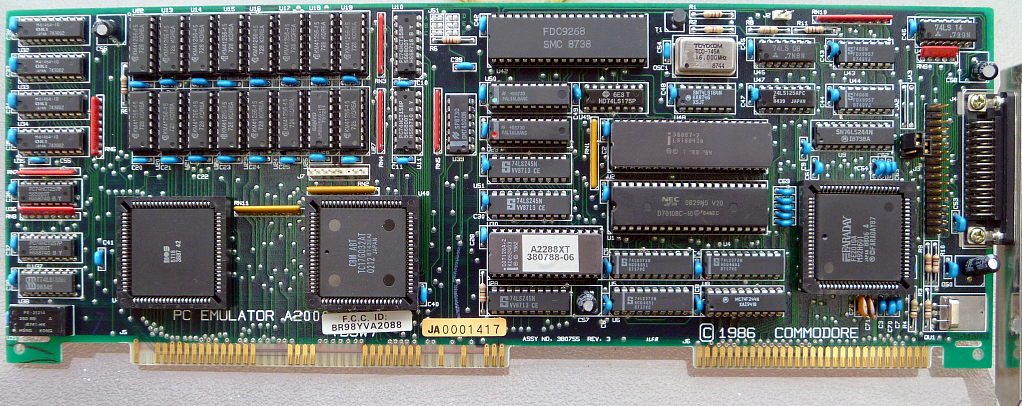
The Commodore A2088 Bridgeboard contains an Intel 8088 CPU at 4.7MHz. No 'Turbo' facility was provided, so it was really just a bog standard PC-XT. Its probably fair to say this modification is not really overclocking your A2088. More like adding a 'turbo' function to it. Before you start, check out Sebastien Boisvert's excellent Bridgeboard Guide . It contains just about everything there is to know about Bridgeboards.
Starting out
Normally in this section I would describe how to reduce the demand on CPU resources used to refresh the RAM by increasing the time between refresh intervals by using a program called 'calcqf'. Unfortunately, it appears the FE2010A 'chipset' used in the A2088 does not support altering this, so the timing cannot be changed. Normally this would give about 5% improvement in speed.
Upgrading the CPU.
Fortunately, there is another way to improve performance - by replacing the original Intel 8088 with an NEC V20. The V20 is an improved version of the 8088, and will give roughly a 20% increase in speed before doing any overclocking. It is best to get a 10MHz version of the V20, so that you can do the modifications shown below to get more performance.
Adding a 'Turbo' function.
Start by downloading this file on Aminet, which contains documentation as well as DOS utilities to enable running your Bridgeboard at either the default 4.77 MHz, 7.15 MHz, or 9.54 MHz. The methods shown on this page are based on documentation included in that file. Read it carefully before you start.
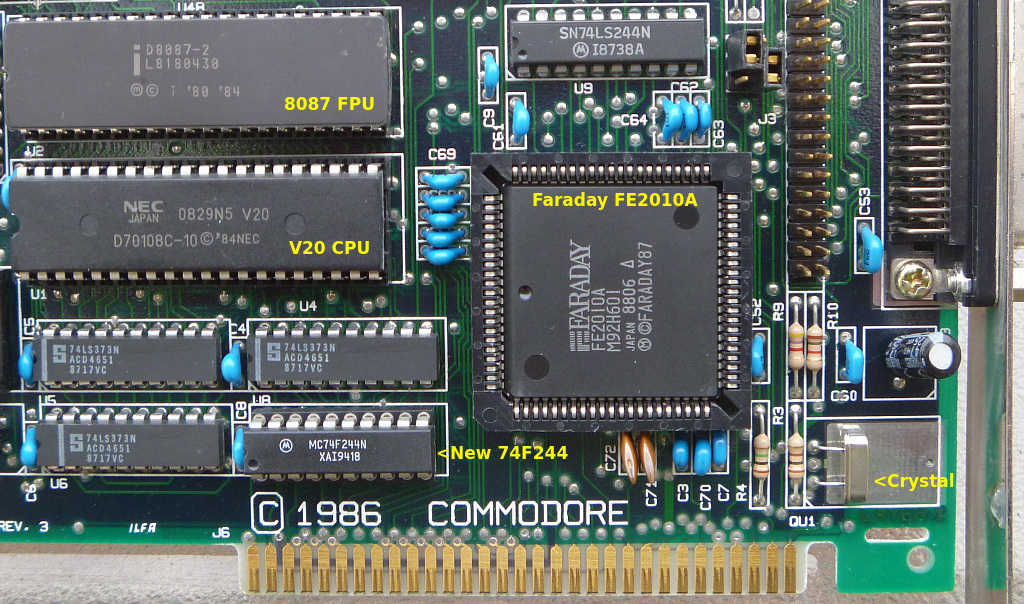
The first and most important step in adding a turbo function is to check you have the correct version 'chipset' on your A2088. Look for a large 'Faraday' PLCC chip just above the ISA slot. It will be either a FE2010 or a FE2010A. The FE2010 is not suitable for adding a turbo function, so if you have one of those, you will need to replace it with a FE2010A. It is a drop-in replacement, and the bridgeboard will continue to work as before if no other modifications are made. I had to change this chip on my A2088, but I was able to easily find one at a reasonable price on ebay. Picture below shows the correct FE2010A fitted. On the left you can also see the V20 chip which replaced the original 8088 as well as an added 8087 FPU. On the bottom left you can see the 74F244 chip, mentioned in the text below. On the extreme bottom right is a 14.31818 MHz crystal, this will need to be changed if you want to run at the maximum 9.54 MHz.
Upgrading to 7.15MHz
With a FE2010A present, it is easy to upgrade to 7.15 MHz. Simply run the CPUCLK.COM program included with the file from Aminet (linked above). Use option 1 to run at 7.15 MHz, option 0 to switch back to 4.7 MHz. You can put the file in autoexec.bat if you like. Note that if you still have the standard 4.77 MHz CPU, it may run very hot or not work properly.
Upgrading to 9.54MHz
This is a little bit more complicated than the 7.15 MHz upgrade. Crystal QU1, located on the extreme bottom right of the PCB just above the ISA slot edge connector, needs to be changed from 14.31818 MHz to 28.63636 MHz. Note that this is the same frequency as the main oscillator in an NTSC A500/A2000. On my Bridgeboard this was a crystal, not an oscillator module - the documentation in the Aminet file implied that some Bridgeboards may have an oscillator there.
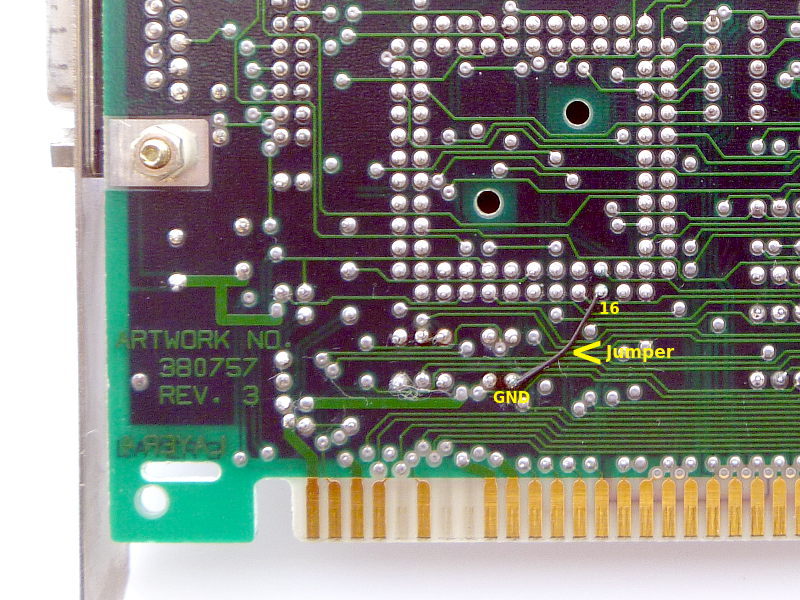
The next step is to add a jumper wire under the FE2010A socket. Connect pin 16 of the FE2010A to ground, as shown here:
The final step was to do some hacky modifications to improve the clock signals to the CPU and FPU so that they would run properly at 9.54 MHz. Instead, I chose to remove U8, a 74LS244 and replace it with a 74F244. I expect a 74HCT244 should also work well. You can see the location of this chip on the picture showing the component side of the PCB above. It is immediately above the '(C) 1986' text on the PCB. I never had the floppy errors the original author experienced. Possibly using the faster 74F244 fixed that problem.
As before, CPUCLK.COM is used to switch the speed, though in this case there is now a third option: 2, that allows operation at 9.54 MHz. The other two options as described before are still available.
Results.
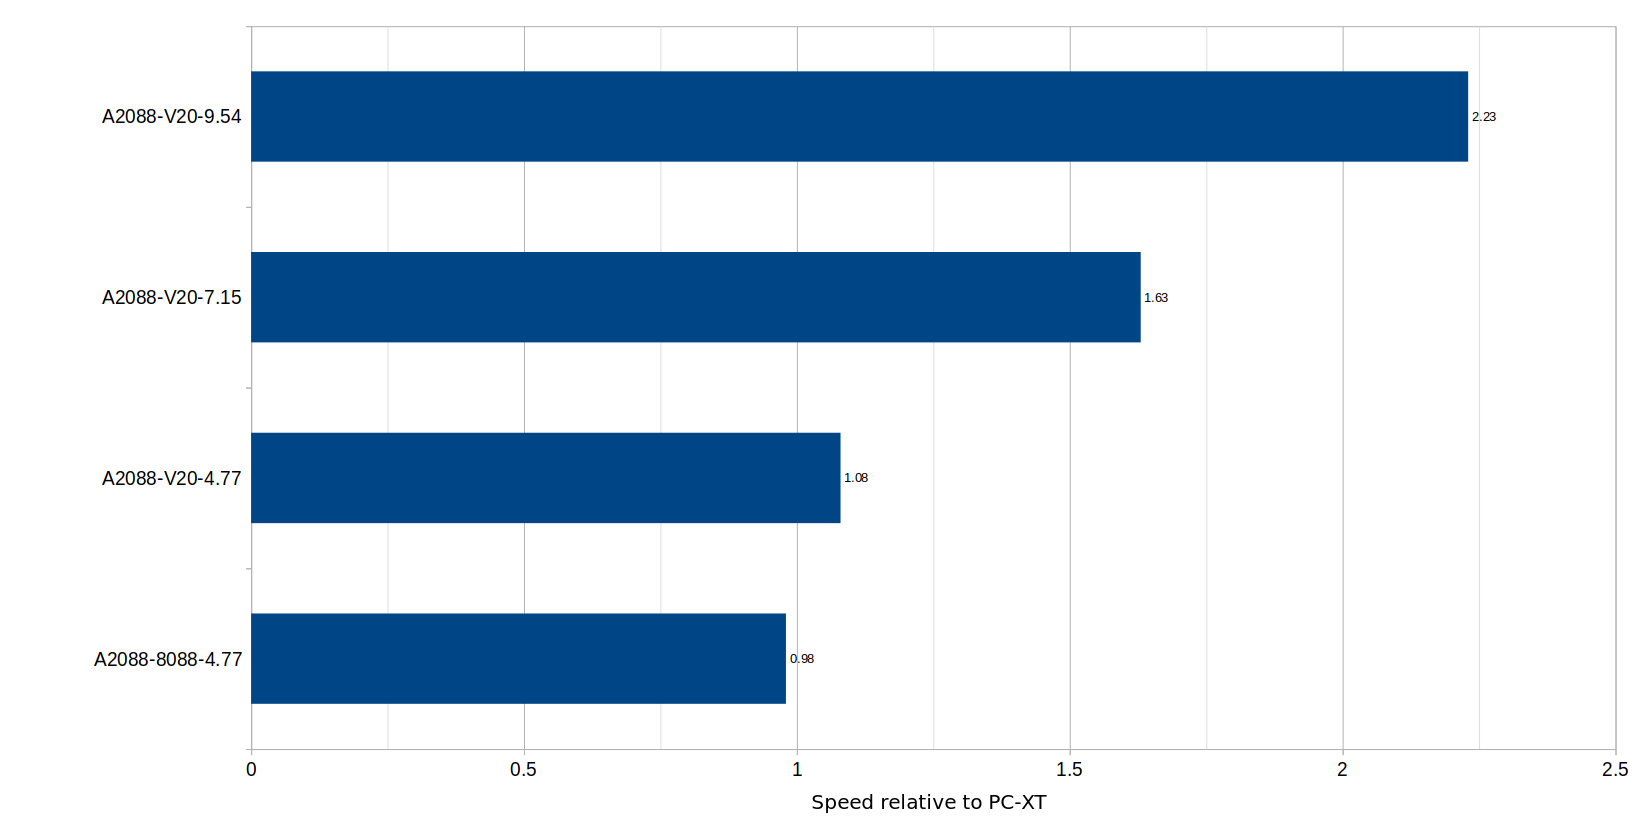
Using the 'checkit' benchmark, I got the results below which shows the results of all the modifications compared to 1, which is the speed of a standard PC-XT. I used 'checkit' instead of Norton Sysinfo, because the benchmark in that is not terribly accurate, and it could not show the difference between an 8088 and a V20. As you can see here, an unmodified A2088 is slightly slower than a standard XT at 0.98. I did not include any other Bridgeboards like the A2286 or the A2386SX, because they are so much faster, the A2088 results would be squashed up on the left and would be hard to see. Yes, even a 'Turbo' XT is painfully slow!
It is theoretically possible to increase the speed further by increasing the crystal frequency past 28.63636 MHz. I don't recommend this as having this frequency other than 28.63636 or 14.31818 MHz will mean that frequency sensitive parts of the motherboard will be clocked incorrectly, resulting in problems with the floppy drive. Timers on the motherboard will also be incorrect. You could make it switchable, so you can switch back to a standard frequency when using floppies, but it can be rather inconvenient. This method could also be used for those who have an FE2010 chip.
Using an 8087 FPU.
If you have an 8087 FPU on your Bridgeboard, you will need to use the version with the correct clock speed rating. Intel made these in three speed grades. The D8087 (without any dash number) is rated at 5MHz, and is only suitable for the A2088 running at the original 4.47 MHz. The C8087-2 or D8087-2 is rated at 8MHz, so it will run at either 4.77 MHz or 7.15 MHz. However, I found that mine will also run at 9.54 MHz without overheating, even though it is overclocked at that speed. Finally, the D8087-1 is rated at 10 MHz, and will run at all three speeds.
Back to main Amiga page.
Introduced 15th October 2023. Updated 14th March 2024. Version 1.2.